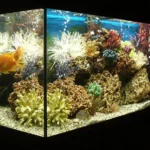
Introduction
Changing the filter cartridge in the fish tank is like offering your underwater friends a fresh, clean home. This seemingly little activity is the only thing to upholds our water world’s health. By removing toxic chemicals and other substances that could harm the health of your fish, you are consequently helping them grow in a healthy environment and live for much longer periods. This is a simple way of keeping your fish active and your tank beautiful.
Like we require clean air, fish, too, need clean water. The filter’s cartridge will not only be about cleanliness but also a part of the sustainable home that provides the utmost health for the fish. With some simple moves, you can change the filter without much trouble. This maintenance helps your fish by giving them a clean habitat and makes your tank look more beautiful, fitting well in your dwelling place.
Table of Contents
Preparing for Filter Cartridge Replacement
Before changing the filter cartridge in the fish tank, please check that you have all of the tools required for the job quickly and seamlessly. Before that, confirm the size and kind of the cartridge filter and whether it is properly used in your fish tank. That is why it is so important to buy the right filter size meant for your tank. With a filter that fits your fish tank environment, your fish will always enjoy clean and secure living conditions.
After that, build a clean area next to your tank. This space shouldn’t have any toxic chemicals or strong cleansers in it. If they go in the tank, they will damage the fish. And, you need a bucket or container ready to lift the water or components from the filter during the replacement.
Lastly, wash your hands properly to rinse off any particles and emulsified oils that could disrupt your fish tank’s water. Oil-based detergents, hand sanitizers, and perfumes can harm your fish. Therefore, use them only after operating your fish tank or installing a new filter. Next, once everything is ready for you, you just need to replace the filter cartridge and renew your fish’s whole water system.
Why is Changing Your Filter Cartridge Important?
Regularly changing the filter cartridge in the fish tank is an important factor that contributes to producing a healthy fish tank for your fish to live in. While passing the water through filters, dirt and wastes are physically trapped in the cartridge, preventing them from returning to the storage tanks. A long-term consequence of this debris buildup is that it clogs the cartridge and reduces its efficiency, potentially harming your pet fish. Additionally, when the debris saturates the cartridge, it can release toxins, and the time the water system releases toxins that could be harmful to your aquatic pets due to water quality deterioration and, consequently, health issues.
Signs It’s Time for a Filter Cartridge Change
- Change the filter after every 2-4 weeks or when you notice certain signs that dust has begun to stay in the unit.
- Slow Water Flow: Water does not flow as it should or is blocked, causing the filter. The filter has to be changed in this case.
- Stuff in the Water: It needs to change if your filter looks dirty and meshes together.
- Bad Smells: This means there is a lot of trash, and you need to change filters.
- Water Looks Dirty: The filter’s not working anymore, so it is a new one required.
Materials Needed
To change the filter in your fish tank, you will need the following materials:
- New filter cartridge
- Water conditioner
- Clean cloth or sponge
- Bucket
- Scissors
How To Change The Filter Cartridge In Your Fish Tank
The filtration process of an aquarium is threatened by algae, which is the reason why frequent changing of the filter will be of great help in maintaining the clarity of your fish tank, the purpose of which is to keep the water clean and, in this way, your fish stay healthy and not threatened by diseases.
Step 1: Preparation
Before you get started, you must first identify the fit replacement cartridge for your unique filter model. Besides, you can have a box to put an exhaust filter cartridge in when removing it.
Step 2: Turn Off the Filter
Safety first. Disconnect the aquarium lifestyle before attempting to replace any of its components. It prevents water from spilling from the cup and keeps the aquarium’s ecosystem safe from contamination.
Step 3: Remove the Filter Cover
Carefully uncover the top part of your filter per carefully. Which filter model might require you to unzip, lift, and slide the cover off? This will cause the filter cartridge for removed.
Step 4: Remove the Used Cartridge
Take the spent cartridge out of the filter with a little care. So, try to take care of it with a bit more, please because it may contain a lot of water and be very muddied. Now, drop the used cartridge in the open box that you have made to avoid spillages.
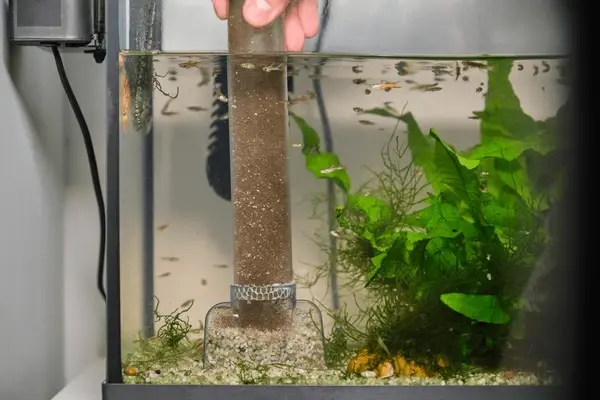
Step 5: Clean the Filter Chamber
Now that the old cartridge is removed, briefly clean the inside of the filter chamber with a fresh, clean cloth by hand. The function is to facilitate the removal of potential obstacles or buildup items that can impact the newly fitted cartridge’s performance.
Step 6: Rinse the New Cartridge
When you install the new cartridge, rinse it under the cool running water. By retaining the water in the tank for some time, it can remove dust, carbon or any other substance that may have unwanted solids in the tank water.
Step 7: Install the New Cartridge
Make sure the new cartridge filter is properly positioned in the filteroid. Make sure that it is properly planned and has a snug contact with the attachment base of the equipment according to the manufacturer’s instructions.
Step 8: Replace the Filter Cover
The next move is to change the old cartridge to the new one, replacing the filter cap.
Step 9: Turn On the Filter
Finally, without the chance of harming the filter, go ahead to restore it to its normal operation. It is advisable to stand in front of the device for a few moments and see if water pours through the new cartridge properly and if there are no leaks.
Step 10: Monitor and Acclimate
Now start the process by replacing the filter cartridge, managing your fish tank closely for the subsequent hours, and ensuring the water stays clear and the fish react positively to the change. While this is probably the case during the first few minutes of installation, the new cartridge will eventually stabilize the system’s water quality. For this purpose, to acclimate your fish to the new water gradually, add very small freshwater portions over some time.
Maximizing Filter Cartridge Lifespan
Just do the following to have your aquarium filter cartridges work better in the long run without degrading the water quality. First, put a pre-filter sponge on it to guard against big stubs and cartridges, not clogging. The water is easily dried, which prolongs the life of your bedding. Cleaning the cartridge, do not forget to use water from the aquarium not the tap, or else you kill the beneficial bacteria in the aquarium. It is also important to feed fish sparingly; the excess food turns to waste, and the filter will work hard to do normally.
By following the feeding instructions, less debris will get into the system, and the filter will be free of problems. Give algae frequent cleanings, especially knocking aquarium plants clean, and run a vacuum on the gravel as too many fish are in the tank. Ensure you start with quality water to keep ammonia spikes under control because these problems might cause your cartridge to function more than its capability. Implementing these guidelines will ensure that your filter cartridges are working efficiently and your tank will always be clean and healthy for your fish.
Regular Maintenance
Cleaning your fish tank regularly ensures a healthy environment. Besides changing the filter when significant, you should empty 10-20% of the water weekly to maintain its cleanliness. It will be best to switch the gravel, using a special vacuum to get everything out of the gravel bed at the bottom, as it can be dirt and waste. Furthermore, ensure that the water you use is neutral or adjusted for proper pH, ammonia, nitrite, and nitrate levels, which are fine for your fish. Repeated cleaning is necessary for the constant wellness of your fish and beautifies your tank throughout the house. By doing this, your fish are happy, and so is your whole aquarium life than just a fishy space. All in all, a clean tank is a happy tank, and trust me when I say that you will enjoy taking care of it.
Conclusion
Regular changes to the filter cartridge in the fish tank are an important element of a clean aquarium with healthy and happy fish. Looking at such an easy way to get ready, this activity proves to be convenient as the fish are being placed in clean homes. It’s from keeping a watch out of your tank after modifying the filter to work for longer periods. It is very beneficial because it can maintain the good health of your fish tank’s water.
It is worth mentioning that keeping the tank is useful not only for the fish but for your environment, too, if you want your space to look even better. For consistent care and treatment, your aquarium can be one of the most beautiful and peaceful details in your atmosphere at home. Keep your aquarium clean but your world of underwater beauty can be home. I appreciate you giving a try on my article on changing your fish tank filter. We hope it helped. Keep studying to overcome the challenges of starting it, and enjoy the process!
Frequently Asked Questions (FAQs)
1. Can I clean and reuse a filter cartridge instead of replacing it?
They can be washed and reused but remember not all filter cartridges are washable. These batteries get charged many times, and they start not working properly so a new set is recommended to be bought. It’s very important to check what the manufacturer has to say so you can use and clean the cartridges sure they are safe to work with.
2. How often should I replace my aquarium filter cartridge?
It depends on the size of the tank, the number of fish in the tank, and the amount of food and waste produced by them. Saw filters every 4 to 6 weeks but keep in mind to check your water and replace the filter only when needed.
3. What should I do if my fish react negatively after changing the filter cartridge?
When fish react to aquarium filter modification in a manner that indicates stress or discomfort, it is sometimes caused by changes in water conditions. The gradual onset of the new conditions is the way to do it. Pretty sure. If the situation doesn’t improve, analyze your water quality parameters and make necessary adjustments, considering pH and ammonia concentrations.
4. Why is rinsing the new filter cartridge important before installation?
Cleaning the new filter cartridge helps to rid the remaining tiny pieces of carbon dust. This will make your fish tank water as clear as you would like it to be. It will also control the keep your fish tank clean. It is just simple water or running water with a cold temperature that needs to be used to wash the cartridge. Not to rely on any chemicals or soap.
Also Must Read: Are Fish Tank Heaters Safe?